To add Elementor to WordPress, install the Elementor plugin from your dashboard, activate it, and launch the visual editor to start building pages. The entire setup takes only a few minutes and does not require coding.
This guide shows the exact steps to install a page builder plugin, set it up correctly, and start designing pages using a drag-and-drop editor. You will also learn how to use templates, widgets, and basic settings to create a fast, responsive website.
TL;DR
- Install Elementor from the WordPress dashboard under Plugins → Add New.
- Activate the plugin to enable the visual page builder.
- Click “Edit with Elementor” to start building pages.
- Use drag-and-drop widgets to design layouts without coding.
- Choose templates to speed up page creation and keep design consistent.
- Optimize performance with updates, caching, and lightweight themes.
What You Need Before Installing a Page Builder in WordPress?
Before you install a page builder plugin, make sure your setup is ready. A clean foundation helps avoid plugin conflicts, loading issues, and performance problems later.
- Self-Hosted WordPress Site: Use a self-hosted setup (WordPress.org) so you can install plugins, customize themes, and control your website fully. If you use WordPress.com, you need a Business plan or higher to install third-party plugins. This setup gives you the flexibility to build custom solutions, insert custom code, and scale your website without limitations.
- Admin Access to Dashboard: You need full access to your WordPress dashboard to install and activate plugins. This allows you to manage settings, upload plugins, and control site features.
- Compatible Theme: Use a lightweight and well-coded theme to avoid conflicts. Themes like Astra, GeneratePress, or Hello Theme work better with visual editors and improve performance. A lightweight setup improves image optimization, enhances text rendering speed, and ensures better search engine indexing.
- Basic Setup Readiness: Ensure your WordPress installation is up to date and functioning properly. This reduces errors during plugin installation and improves compatibility.
- Awareness of Alternatives (Optional): There are multiple page builder plugins available. Some offer similar features with different workflows, so choosing the right tool depends on your needs, performance goals, and ease of use.
Learn More: How to Disable Comments in WordPress
How WPTasks Helps You Avoid Setup Issues and Site Errors?
Setting up a page builder is simple, but issues like plugin conflicts, slow performance, or layout breaks can still occur if not handled properly. Without ongoing attention, these problems often repeat during updates or site changes.
WPTasks helps online businesses manage this with a subscription model. Monthly development hour retainers handle setup, fixes, and custom work, while monthly maintenance subscriptions keep the site stable through updates and monitoring. Hosting support ensures speed and uptime, and the white-label approach lets agencies deliver everything under their own brand.
Make Elementor Work Perfectly on Your WordPress Site
Skip the setup stress and avoid costly mistakes. Get expert help to install, customize, and optimize Elementor for a smooth, fast website.
Steps to Add Elementor to WordPress
If you’re looking to gain complete control over your website creation process, installing Elementor is one of the best decisions you can make. It’s easy to get started, and this step-by-step guide will walk you through everything you need to do to add Eleto install Elementor plugin in WordPress.
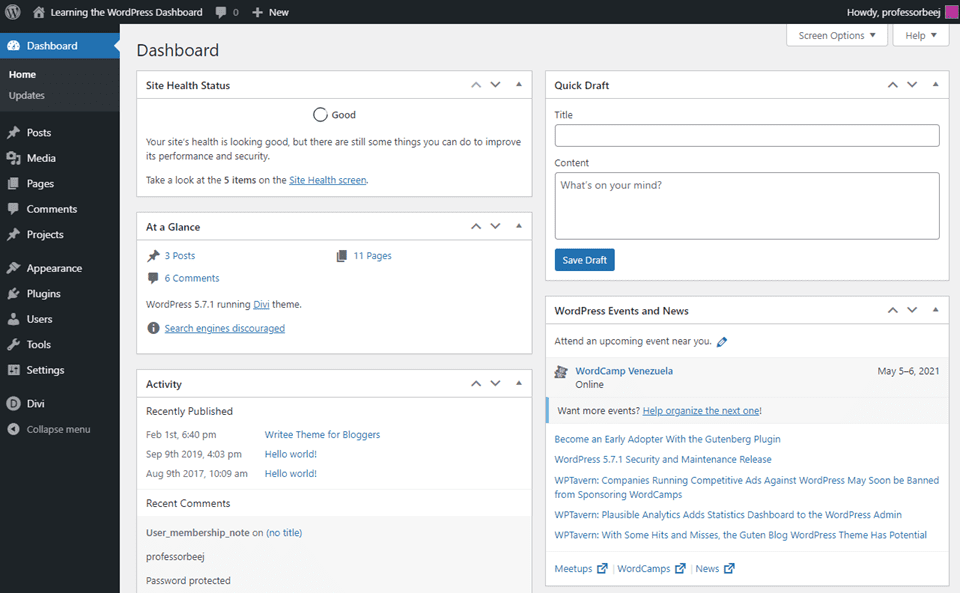
Step 1: Log in to Your WordPress Dashboard
Start by logging into your WordPress website’s admin area. This is your central hub for creating content, installing WordPress plugins, changing WordPress themes, and managing everything related to your entire site.
Step 2: Go to Plugins and Click Add New
From the left panel, hover over Plugins, then click Add New. This is where you can browse thousands of plugins or even upload plugin files manually. In our case, Elementor is already available in the WordPress repository.
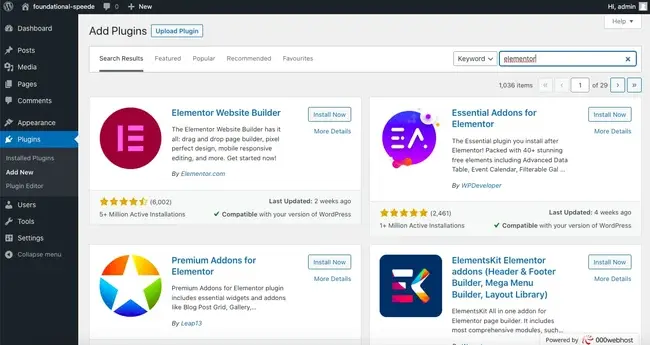
Step 3: Search for the Elementor Plugin
In the search field at the top right, type “Elementor Page Builder.” You’ll see it appear as one of the top results. This is the official Elementor plugin, known for its smooth drag-and-drop editor and powerful design capabilities.
Step 4: Install and Activate Elementor
Click the Install Now button, then click Activate once installation is complete. This will enable Elementor on your site and unlock the editor so you can start customizing your pages. From now on, you’ll see the option to Edit with Elementor anytime you create or edit a web page.
Step 5: Complete Elementor Setup After Activation
After activation, Elementor integrates into your WordPress dashboard and becomes part of your website builder workflow. Here’s what you’ll notice:
- A new Elementor menu in the dashboard sidebar, where you can access settings and tools.
- A button widget labeled “Edit with Elementor” on all pages and individual blog posts.
- Immediate access to the Elementor template library, filled with pre-made layouts and blocks.
- Easy customization of any page using the Elementor sidebar, where you’ll drop widgets like text blocks, images, image galleries, image boxes, forms, videos, buttons, and even Google Maps.
You can begin creating professional-looking landing pages, custom product pages, and even full websites using ready-made Elementor templates or by starting from scratch.
How to Create Your First Page with Elementor?
Now that you’ve successfully installed and activated the Elementor plugin, it’s time to dive into the fun part: building websites.
Whether you’re designing a landing page, a homepage, or starting a blog, Elementor makes the website creation process simple and intuitive, even for beginners.
Create a New Page or Post in WordPress
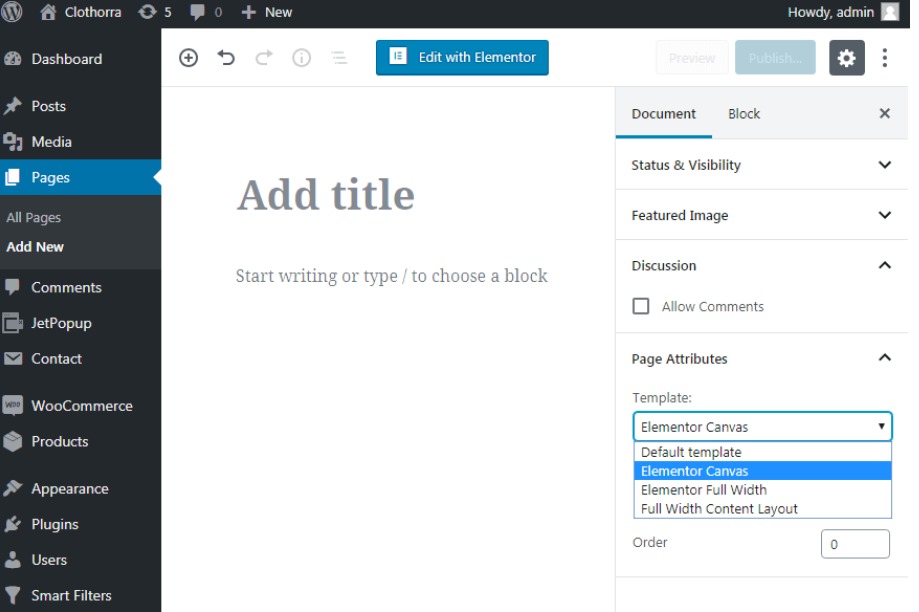
To begin, go to your WordPress dashboard and navigate to Pages → Add New. Give your page a title, something like “Home,” “About Us,” or “My First Page.” You’ll notice the standard WordPress block editor, but since we’ll be using Elementor, we can skip that.
Click Edit with Elementor to Launch Builder
Just above the content area, you’ll see a button labeled “Edit with Elementor.” Click it to launch the Elementor editor. This is where the magic happens. From here on, you’ll be working with a drag-and-drop editor that gives you complete control over every element on the page.
Explore the Elementor Interface
Once inside, take a moment to get familiar with the layout. The screen is divided into two main parts:
- On the left panel, you’ll find the Elementor sidebar, which includes all your basic widgets like image box, text, heading, button widget, video, spacer, and more.
- On the right, you’ll see your live page preview. As you add and move elements, changes appear in real time; this is part of what makes Elementor good for visual thinkers.
You can build your layout using sections and columns, making it easy to visually structure your content. These same building blocks help you create attention-grabbing headlines, dynamic content layouts, and visually appealing formats for better user interaction.
Add Basic Elements to Your Page
Drag a heading widget from the sidebar into your canvas. Then, add some text, an image, or even a button to guide your visitors. You can customize fonts, colors, sizes, and spacing right from the panel, with no CSS required (though you can use custom CSS for extra control).
Want more than just basic design? Elementor’s template library includes pre-designed layouts, so you can start with a polished look and customize from there. Just click the folder icon to enter the Elementor template library and import a ready-made Elementor template.
Save and Preview Your Layout
Once you’ve arranged your content, click “Preview” to see how your page looks. If you’re happy with it, click “Publish.” Congratulations, you’ve just built your first page with Elementor!
This intuitive setup makes it easy to build an entire site, from individual blog posts to custom product pages for your online store. Over time, you’ll be able to explore more advanced features, connect custom forms, insert Google Maps, and apply a consistent design system across your site.
Find Out: How to Start a WordPress Blog
Tips for Using Elementor Effectively in WordPress
Elementor is packed with tools that help you design not just individual pages but your entire website. To get the most out of the Elementor plugin, here are some smart tips that can streamline your workflow and improve site performance.

Leverage Pre-Built Templates and Blocks
One of the best things Elementor offers is its vast template library. These Elementor templates let you build pages quickly with professionally designed layouts. You can choose Elementor blocks for testimonials, image galleries, headers, and footers, and even design custom product pages. This saves time and gives your site a consistent page layout.
Install a Compatible Theme
To ensure Elementor runs smoothly, use a theme designed to work well with it. The Hello Theme, developed by the Elementor team, is lightweight and fully compatible. It gives you a blank slate to customize every part of your site using the Elementor page builder, whether you’re creating professional websites or simple blogs.
Keep Elementor and WordPress Updated
Performance issues like Elementor’s slow loading often come from outdated plugins or WordPress versions. Always keep your WordPress installation and Elementor plugin up to date to ensure everything runs smoothly. Updating also gives you access to new features and fixes.
Add Third-Party Add-ons
Elementor’s flexibility grows even more when you add new plugins like Essential Addons, Happy Addons, or ElementsKit. These add-ons help you build a complete online shopping experience with custom product pages, cart and checkout pages, and user registration modules.
These extend your widget library with features like advanced sliders, pricing tables, and interactive content, all without requiring code. Just go to Plugins → Add New, search, and click install to activate.
Fine-Tune Site Settings
Use Elementor’s built-in site settings to define global fonts, colors, and layout defaults. This helps maintain design consistency across your entire website, from the homepage to individual blog posts. It’s also useful to optimize user engagement, improve search engine indexing, and ensure only exposed content properties are properly rendered.
Know More: How to Create a WordPress Disaster Recovery Plan
Elementor to WordPress: Troubleshooting Common Elementor Issues
Even though Elementor is known for its ease of use, you might run into occasional hiccups. Here’s how to troubleshoot common problems and get back to building.
Fixing the “Stuck on Loading Screen” Issue
This is a common issue that can be caused by other WordPress plugins or a browser conflict. Start by deactivating each plugin in turn to identify the culprit. Also, try clearing your browser cache or switching to a different browser. If the problem persists, check if your theme is fully compatible with Elementor.
Theme or Plugin Conflicts
Conflicts often occur when scripts are not loaded individually or when multiple plugins try to control the same functionality. Always use trusted themes and ensure any new plugin you install is well-rated and regularly updated. The Elementor team regularly updates compatibility with major themes and tools, but checking before installing is always wise.
Memory Limit Issues
If your Elementor editor crashes or freezes, it might be because WordPress has reached its memory limit. You can fix this by increasing the PHP memory limit in your wp-config.php file (set it to 256M or more). Hosting providers can often help with this if you’re unsure.
Connect Your Elementor Account
For better management and support, connect your Elementor account directly from the dashboard. This allows access to premium templates, support, and additional features that improve your design system and site performance.
Keep Reading: Role of Unlimited WordPress Support
Elementor Free vs Elementor Pro
If you’re just getting started, the free version of Elementor is more than enough to help you create beautiful pages. It includes the drag-and-drop editor, access to basic widgets (like the Elementor button, image, heading, and text), and mobile-responsive editing. You can build great pages with it, even your entire site if you’re creative!
But if you’re looking to take your website creation process to the next level, upgrading to the Elementor Pro plugin will unlock some powerful tools.
What’s Included in Elementor Pro?
- Theme Builder: Customize every part of your theme, including headers, footers, and even blog post templates.
- WooCommerceBuilder: Design custom product pages and shop layouts for your online store.
- Advanced Widgets: Get access to premium tools like contact forms, sliders, price tables, countdowns, and more.
- Elementor Template Library: Unlock hundreds of professionally designed templates and blocks.
- Global Widgets & Site Settings: Apply the same web design elements across your entire website for a cohesive look.
Plus, Elementor Pro gives you access to expert support, exclusive updates, and more ways to improve how Elementor works for your needs.
How to Install Elementor Pro in WordPress?
If you’ve already purchased Elementor Pro, you’re now ready to unlock advanced features like the Theme Builder, WooCommerce integration, and access to the full Elementor template library.
Installing it on your WordPress website is straightforward. Follow these steps:
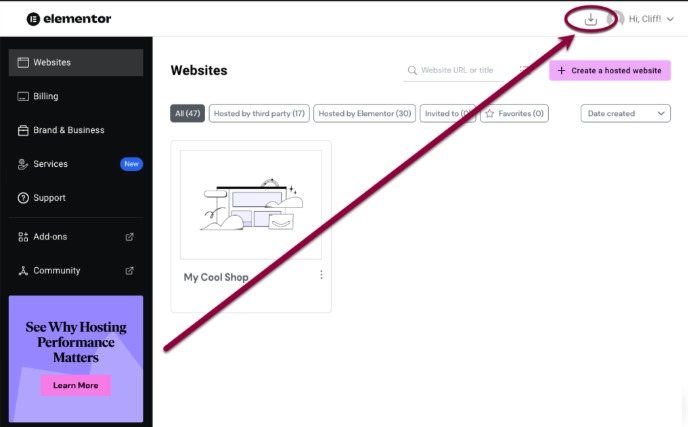
- Download the Pro Plugin: Log in to your Elementor account on Elementor. Once inside your dashboard, you’ll find the option to download the Elementor Pro plugin as a .zip file.
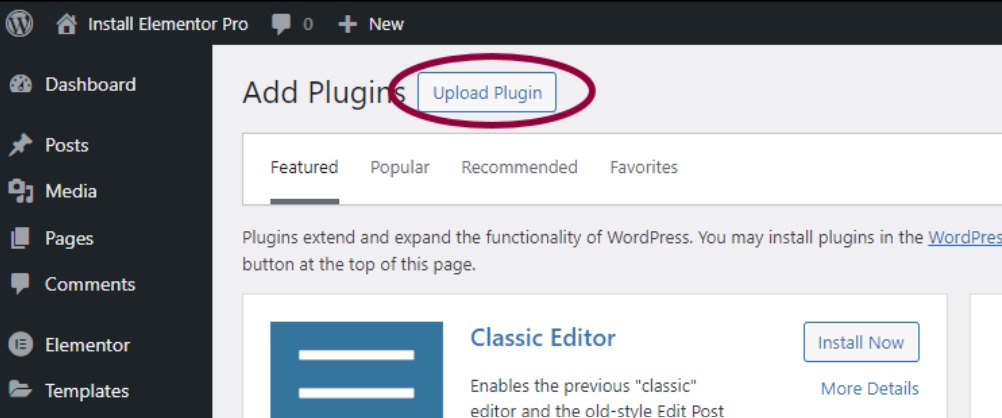
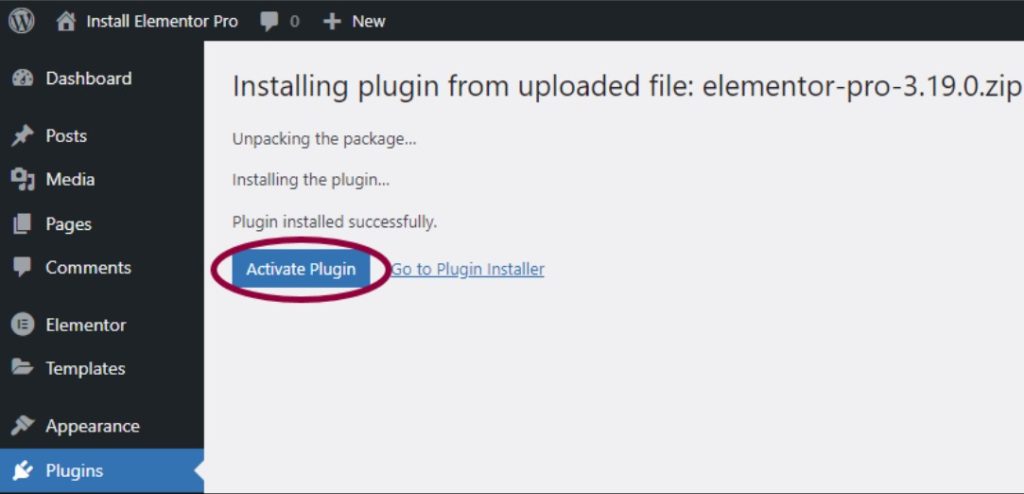
- Upload the Plugin to WordPress: Head over to your WordPress dashboard, then go to Plugins → Add New → Upload Plugin. Click Choose File, select the .zip file you just downloaded, and then click Install Now.
- Activate the Plugin: Once installed, click Activate. Make sure the free Elementor plugin is already installed and active. Elementor Pro builds on top of the free version and won’t work without it.
- Connect Your License: After activation, you’ll be prompted to connect your Elementor Pro license. Click the Elementor button that says “Connect & Activate” and log in to your Elementor account. This will validate your license and unlock all premium features.
- Explore the Pro Features: Once connected, you’ll now have access to advanced tools in the Elementor sidebar, including the Theme Builder, WooCommerce widgets, custom CSS options, image box, sliders, Google Maps widget, and more.
Check Out: Top WordPress Malware Removal Plugins
Best Elementor Settings to Improve Speed and SEO
Optimizing Elementor settings helps you reduce load time, improve Core Web Vitals, and keep your site fast. Small changes here can make a big difference in performance.
Focus on these key settings to get the best results:
- Disable Unused Widgets: Elementor loads multiple widgets by default. Turn off the ones you don’t use to reduce unnecessary scripts and improve page speed.
- Optimize CSS Output: Enable improved CSS loading in Elementor settings. This reduces file size and speeds up page load times by avoiding excess styling code.
- Use a Lightweight Theme: Choose themes like Hello Elementor or Astra that are built for speed. A heavy theme combined with Elementor can significantly slow down your site.
- Enable Performance Settings: Turn on Elementor’s built-in performance features, such as optimized DOM output and improved asset loading. These settings reduce code bloat and improve loading time.
Conclusion
Getting started with a visual page builder in WordPress is simple and fast. Once the plugin is installed and activated, you can create pages using a drag-and-drop editor, templates, and flexible layout controls without writing code.
The real value comes from how you manage your setup over time. Using a compatible theme, keeping plugins up to date, and optimizing performance will help you build a stable, responsive website that is easy to scale and maintain.
FAQs
How do I install Elementor in WordPress?
Go to your WordPress dashboard, open Plugins → Add New, search for Elementor, then click Install and Activate. Once active, you can start building pages using the visual editor.
Why is Elementor not loading properly?
This can happen due to plugin conflicts, low memory limits, or outdated WordPress versions. Try disabling other plugins, increasing memory limits, and updating your site.
What is the easiest way to start building pages with Elementor?
Create a new page and click Edit with Elementor. Use drag-and-drop widgets and pre-built templates to design your layout quickly without coding.
Which theme works best with Elementor?
Lightweight themes like Astra, GeneratePress, or Hello Theme work best. They are optimized for performance and compatibility.
Do I need Elementor Pro to build a website?
No, the free version is enough to create basic pages and layouts. The Pro version is useful if you need advanced features such as a theme builder, custom headers, and dynamic content.

